Welcome to the exciting world of 3D printing! This guide is designed to be your roadmap, taking you step-by-step from thinking about buying a printer to holding your very first successful print.
Key Takeaways
- FDM printers are the best starting point for beginners due to their affordability and versatility.
- Auto-bed leveling is the most crucial feature to look for in your first 3D printer.
- Always start with PLA filament; it is the easiest and most forgiving material to print.
- A perfect first layer is the secret to preventing 90% of common print failures.
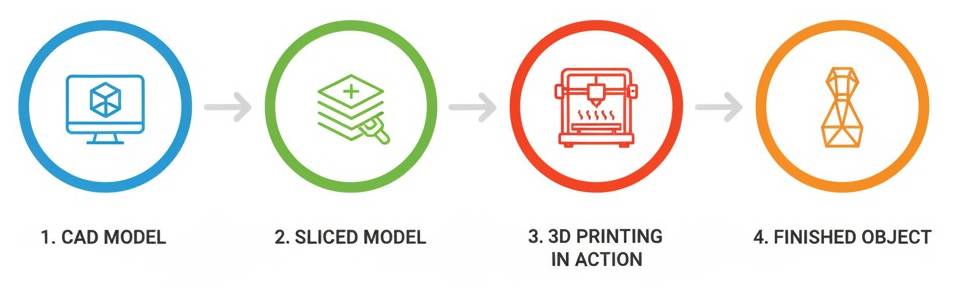
The Big Picture: How a 3D Print is Made
First, let's look at the entire journey from an idea to a physical object. The process follows four main stages:
- 1. Concept & Design: It all starts with a 3D model file.
- 2. Slicing: You use a "slicer" program to translate the model into instructions for your printer.
- 3. Printing: The printer reads the instructions and builds the object layer by layer.
- 4. Post-Processing: The finished print may need some minor cleanup.
Your Step-by-Step Journey to Your First Print
This is the core of the guide. Follow these five steps in order, and you'll be printing in no time.
Step 1: Define Your Goal - "What Do I Want to Make?"
Before you even look at a printer, ask yourself what you want to create. Your answer is the single most important factor in choosing the right machine. Here is a quick breakdown of the two main technologies:
| Technology | Best For | Pros | Cons |
|---|---|---|---|
| FDM (Filament) | Functional parts, household items, beginners | Affordable, easy to use, strong parts | Visible layer lines, less detail |
| SLA (Resin) | Miniatures, jewelry, highly detailed models | Incredible detail, smooth surfaces | Messy chemicals, brittle parts, toxic fumes |
Step 2: Choose Your Technology and Find Your First Printer
Based on your goal, you'll likely be starting with FDM. You don't need to spend a fortune. For a detailed breakdown of the best machines available right now, be sure to read our complete 2026 3D Printer Buyer's Guide. For your very first FDM printer, look for these key features:
- Auto-Bed Leveling: This is non-negotiable for a beginner. It automates the most difficult part of setup and prevents the most common cause of print failures.
- Decent Build Volume: A build area around 220x220x250mm is a great starting point and is large enough for most common projects.
- Strong Community Support: Choose a popular brand like Creality, Bambu Lab, or Prusa. If you have a problem, it's almost certain that someone online has already solved it.
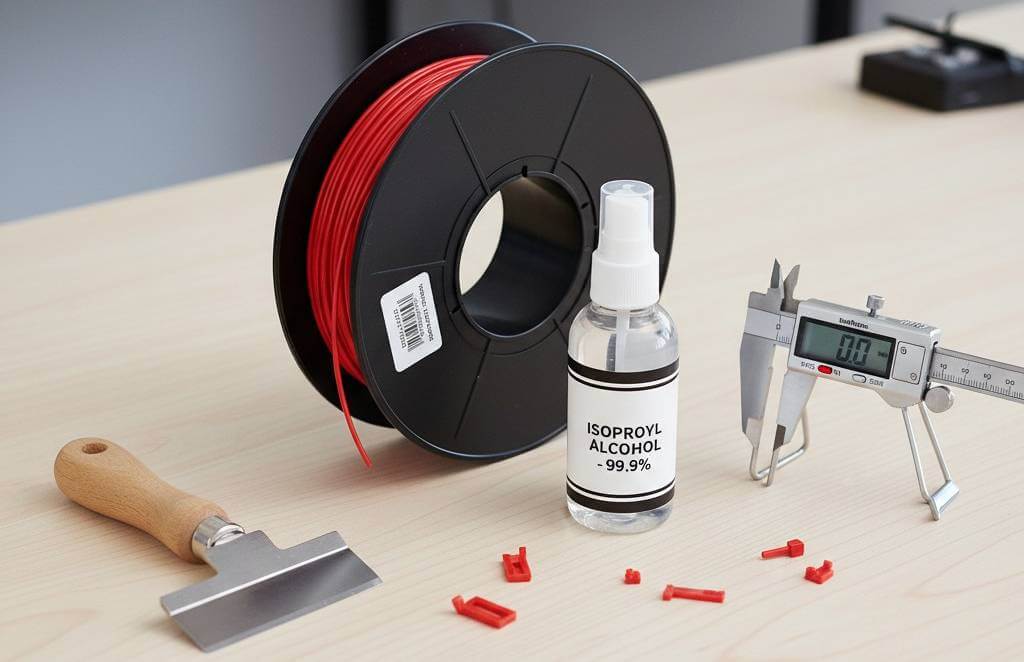
Step 3: Get Your Essential First Accessories
Your printer doesn't come with everything you need. Order these at the same time to avoid waiting:
- Filament: Start with PLA. It's the easiest material to print with. Buy two spools of different colors from a reputable brand.
- Digital Calipers: Essential for measuring parts and calibrating your printer accurately.
- IPA (Isopropyl Alcohol): For cleaning the print bed to ensure your prints stick properly.
- A Spatula or Scraper: For safely removing finished prints from the bed.
Planning to sell your prints?
Don't guess your prices. Factor in material, electricity, and machine wear instantly.
Calculate Your Print Cost NowStep 4: Slice Your First Model
Now it's time to use the "slicer." This software translates your 3D model (an STL file) into a G-code file your printer can read. Download a free slicer like Cura or PrusaSlicer.
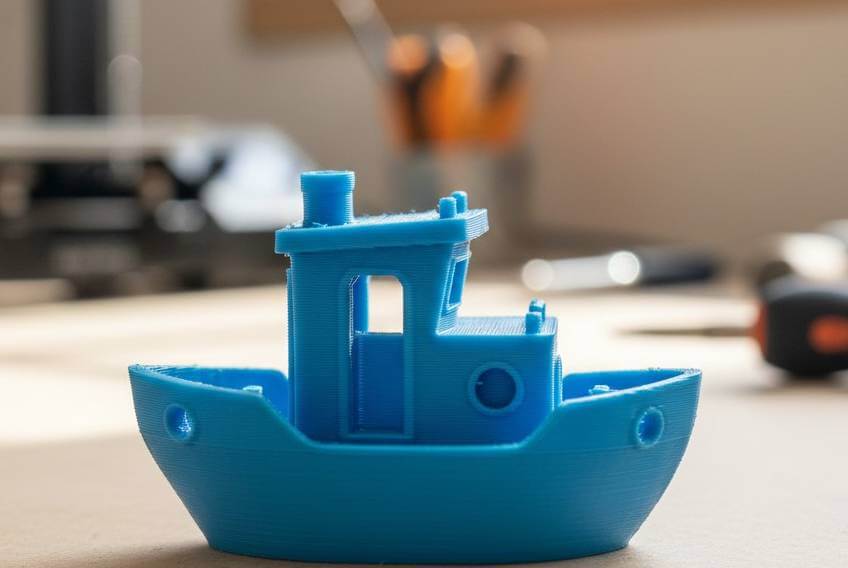
- Find a Model: Go to a site like Printables.com and search for "calibration cube" or "benchy". These are small, fast prints designed to test your printer.
- Open it in the Slicer: Your slicer will have a default profile for your printer model. Use it.
- Use Default Settings: For your first print, don't change anything! Just select the material (PLA) and use the standard quality setting (usually around 0.2mm layer height).
- Slice and Save: Click the "Slice" button. The program will generate the G-code. Save this file to your printer's memory card or send it over Wi-Fi.
Step 5: Your Very First Print!
Don't try to print a giant, complex dragon. The calibration cube is your first test.
- Load the file onto your printer and start the print.
- Watch the first layer. This is the most important part. The melted plastic should come out looking like slightly flattened lines that are neatly stuck to the print bed.
- Learn from It: Your first print probably won't be perfect. That's okay! The calibration cube is a diagnostic tool. By seeing its flaws, you can learn what to adjust, making every future print better. Welcome to the world of 3D printing!
Supporting Knowledge: Slicer Settings & Filaments
As you move beyond your first print, you'll need to understand these concepts in more detail.
A Deeper Dive into Slicer Settings
The slicer is the brain of the operation. Mastering your slicer is key to great prints. Here are the three most important settings:
- Layer Height: This is the vertical resolution. A smaller layer height (0.1mm) creates a smooth, detailed surface but is slow. A larger layer height (0.3mm) is much faster but the layers will be more visible.
- Infill: This is the internal support structure. An infill of 15-25% is perfect for most models. For functional parts that need to be strong, you might use 50% or more.
- Supports: Your printer can't print on thin air. If your model has steep overhangs (like an outstretched arm), the slicer will automatically generate removable support structures to hold it up.
A Deeper Dive into Filaments
The filament you choose determines the properties of your final part. While there are dozens of types, you will likely start with one of these four. For your first prints, always start with PLA.
| Filament | Key Properties | Print Temps | Best For | Keep in Mind |
|---|---|---|---|---|
| PLA | Easy to print, rigid | 190-220°C / 50-60°C | Models, prototypes | Brittle, low heat resistance. |
| PETG | Durable, flexible | 220-250°C / 70-80°C | Mechanical parts | Can be "stringy". |
| ABS | Very strong, heat resistant | 240-260°C / 90-110°C | Car parts, functional items | Needs an enclosure (fumes). |
| TPU | Very flexible, rubber-like | 210-230°C / 40-60°C | Phone cases, grips | Prints very slowly. |
Common Pitfalls & How to Avoid Them
Your first prints will likely have some issues—that's a normal part of learning! Here are the most common problems:
- Print Won't Stick (Adhesion Failure): This is the #1 beginner problem. To fix it, clean your print bed with Isopropyl Alcohol and make sure your bed is perfectly leveled.
- Warping: The bottom corners of your print lift off the bed. This is caused by the plastic cooling too quickly. Use a "brim" in your slicer settings to add extra surface area to hold the corners down.
- Stringing: You see thin, hair-like strings of plastic between different parts of your model. This is often fixed by adjusting "retraction" settings in your slicer.